はじめに
前回の記事ではSpringBatchの初歩的な知識を学び、起動までを行いました。
今回は簡単に値の受渡しの確認をコマンドライン引数を使用して行い、渡されたパラメーターを「JobParametersValidator」で検証できるようにします。
最終的に「JobExecutionContext」を使用して「Tasklet1」「Tasklet2」への値の受渡しまでをゴールとします!
設定など諸々書いてあるので、前回の記事をお読みでない方は下記からどうぞ!
コマンドライン引数を使用して、パラメーターの値を渡す
Jobにパラメーターを設定していきます。
package com.batch.tasklet;

import org.springframework.batch.core.StepContribution;
import org.springframework.batch.core.configuration.annotation.StepScope;
import org.springframework.batch.core.scope.context.ChunkContext;
import org.springframework.batch.core.step.tasklet.Tasklet;
import org.springframework.batch.repeat.RepeatStatus;
import org.springframework.beans.factory.annotation.Value;
import org.springframework.stereotype.Component;


@Component("Tasklet1")
@StepScope
public class Tasklet1 implements Tasklet{

	// Jobにパラメーターを設定する
	@Value("#{jobParameters['StringParam']}")
	private String StringParam;

	@Value("#{jobParameters['IntegerParam']}")
	private Integer IntegerParam;

	@Override
	public RepeatStatus execute(StepContribution contribution, ChunkContext chunkContext) throws Exception {

		System.out.println("Tasklet1の出力です");

		// Jobパラメータを出力する
		System.out.println("StringParamの値は" + StringParam);
		System.out.println("IntegerParamの値は" + IntegerParam);
		return RepeatStatus.FINISHED;
	}
}
設定したパラメーターに値を代入します。値の代入はコマンドライン引数を使用して代入していきます。

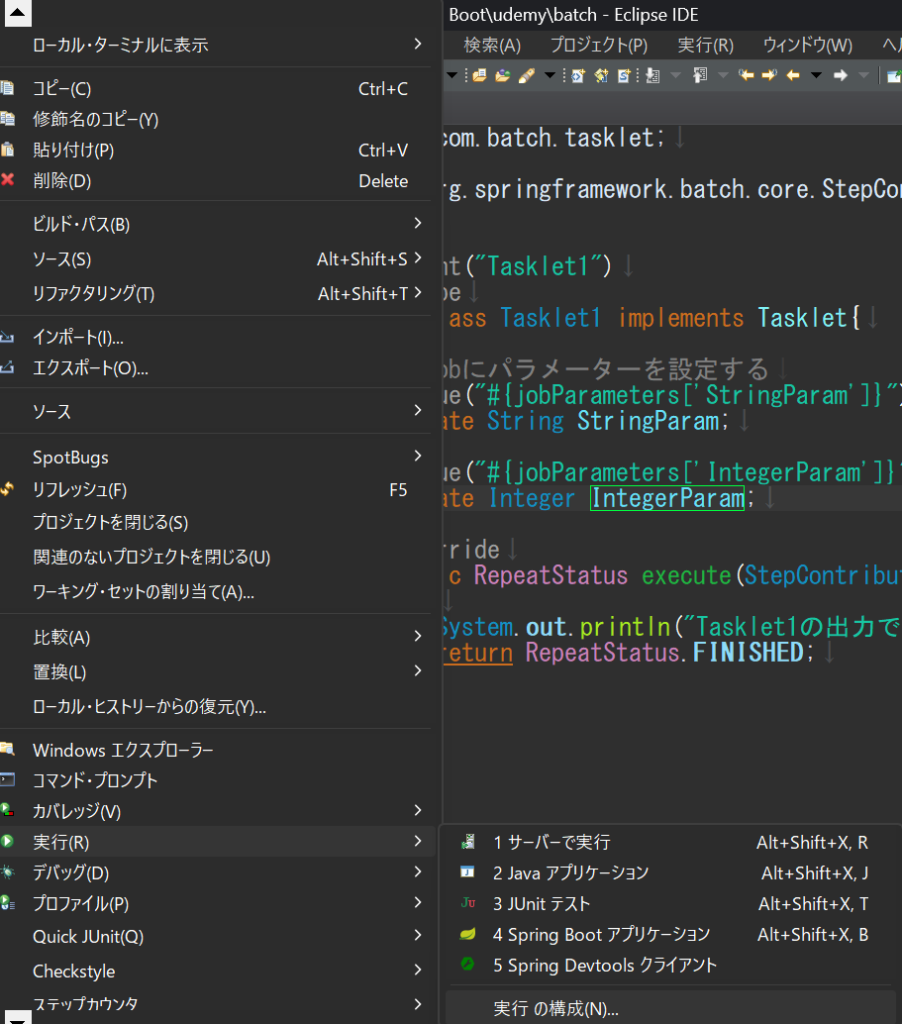
実行の構成から、「引数」へ以下のような任意の値を設定します。

実行を押してみましょう!

しっかりと値を受け取れているのが確認できました。
渡されたパラメーターを検証できるようにする
「JobParametersValidator」クラスを実装する事で、検証クラスを作成する事が出来ます。
それでは以下のようにパッケージとクラスを作成しましょう!

「Tasklet1JobParametersValidator.java」を作成し、検証するロジックを定義していきます。
package com.batch.validator;

import org.springframework.batch.core.JobParameters;
import org.springframework.batch.core.JobParametersInvalidException;
import org.springframework.batch.core.JobParametersValidator;

public class Tasklet1JobParametersValidator implements JobParametersValidator{

	@Override
	public void validate(JobParameters parameters) throws JobParametersInvalidException {

		// StringParamの値を確認する
		// パラメーターの値を取得する 引数には取得したい値のキーを設定する
		String StringParam = parameters.getString("StringParam");

		if (!StringParam.equals("Java") && !StringParam.equals("Ruby")) {
			throw new JobParametersInvalidException("StringParamの値は「Java」「Ruby」を受け付けます。 入力された値 : 」" + StringParam);
		}

		// IntegerParamの型を確認する
		String IntegerParam = parameters.getString("IntegerParam");

		// 数値チェック
		try {
			Integer.parseInt(IntegerParam);
		} catch (Exception e) {
			throw new JobParametersInvalidException("IntegerParamは数値のみ受け付けます 入力された値 : " + IntegerParam);
		}
	}
}- StringParamで受け取った値が「Java」「Ruby」でない場合、例外を出力します。
- IntegerParamで受け取った値が数値でない場合、例外を出力します。
作成した検証クラスを「SpringConfig.java」で定義し、使用します。
package com.batch.config;

import org.springframework.batch.core.Job;
import org.springframework.batch.core.JobParametersValidator;
import org.springframework.batch.core.Step;
import org.springframework.batch.core.job.builder.JobBuilder;
import org.springframework.batch.core.launch.JobLauncher;
import org.springframework.batch.core.launch.support.RunIdIncrementer;
import org.springframework.batch.core.repository.JobRepository;
import org.springframework.batch.core.step.builder.StepBuilder;
import org.springframework.batch.core.step.tasklet.Tasklet;
import org.springframework.beans.factory.annotation.Autowired;
import org.springframework.beans.factory.annotation.Qualifier;
import org.springframework.context.annotation.Bean;
import org.springframework.context.annotation.Configuration;
import org.springframework.transaction.PlatformTransactionManager;

import com.batch.validator.Tasklet1JobParametersValidator;

/**
 * 設定クラス
 * このクラスはアプリケーションの設定を管理します。
 */

@Configuration
public class SpringConfig {
	// ジョブの実行を管理する
	private final JobLauncher jobLauncher;
	// ジョブの実行結果や進行状況をデータベースへ記録する
	private final JobRepository  jobRepository;
	// トランザクションを開始し、コミットまたはロールバックする
	private final PlatformTransactionManager platformTransactionManager;

	@Autowired
	@Qualifier("Tasklet1")
	private Tasklet Tasklet1;


	public SpringConfig(JobLauncher jobLauncher, JobRepository jobRepository,
			PlatformTransactionManager platformTransactionManager) {
		this.jobLauncher = jobLauncher;
		this.jobRepository = jobRepository;
		this.platformTransactionManager = platformTransactionManager;
	}

	// 検証クラスの呼び出し
	@Bean
	public JobParametersValidator jobParametersValidator() {
		return new Tasklet1JobParametersValidator();
	}


	// Stepを定義する
	@Bean
	public Step tasklet1Step1() {
		// 第一引数はStep名を定義する
		return new StepBuilder("tasklet1Step1" , jobRepository)
				// Taskletを指定する
				.tasklet(Tasklet1 , platformTransactionManager)
				.build();
	}

	// Jobを定義する
	@Bean
	public Job tasklet1Job1() {
		// 第一引数はJob名を定義する
		return new JobBuilder("tasklet1Job1" , jobRepository)
				// ジョブを実行するたびに一意のIDを生成
				.incrementer(new RunIdIncrementer())
				// 実行するStepを指定する
				.start(tasklet1Step1())
				// 検証する
				.validator(jobParametersValidator())
				.build();
	}

}
コマンドライン引数でStringParamに「Python」を指定する
コマンドライン引数でStringParamに「Python」を指定すると検証に引っかかり、例外を出力してくれるはずです。見てみましょう!

ログを見ると、以下のように検証出来ている事が確認できました。
Caused by: org.springframework.batch.core.JobParametersInvalidException: StringParamの値は「Java」「Ruby」を受け付けます。 入力された値 : 」Pythonコマンドライン引数でIntegerParamに「TEST」を指定する
同じように、IntegerParamも検証出来ているかを確認してみます。

ログを見ると、以下のように検証出来ている事が確認できました。
Caused by: org.springframework.batch.core.JobParametersInvalidException: IntegerParamは数値のみ受け付けます 入力された値 : TESTJobExecutionContextを使用して、複数のTaskletで値を受け渡す
例えば「Tasklet1」「Tasklet2」があったとして、「Tasklet1」の値を「Tasklet2」へ受け渡したい場合などはどのように実装するのかを解説します。
この場合、受渡役の「JobExecutionContext」を定義します。
「JobExecutionContext」が値の仲介を担ってくれます。つまり、バッチジョブ実行中の状態管理やデータ共有をしてくれるという事です。
「Tasklet1 .java」に「JobExecutionContext」を定義していきます。
package com.batch.tasklet;

import org.springframework.batch.core.StepContribution;
import org.springframework.batch.core.configuration.annotation.StepScope;
import org.springframework.batch.core.scope.context.ChunkContext;
import org.springframework.batch.core.step.tasklet.Tasklet;
import org.springframework.batch.item.ExecutionContext;
import org.springframework.batch.repeat.RepeatStatus;
import org.springframework.beans.factory.annotation.Value;
import org.springframework.stereotype.Component;


@Component("Tasklet1")
@StepScope
public class Tasklet1 implements Tasklet{

	// Jobにパラメーターを設定する
	@Value("#{jobParameters['StringParam']}")
	private String StringParam;

	@Value("#{jobParameters['IntegerParam']}")
	private Integer IntegerParam;

	@Override
	public RepeatStatus execute(StepContribution contribution, ChunkContext chunkContext) throws Exception {

		System.out.println("Tasklet1の出力です");

		// Jobパラメータを出力する
		System.out.println("StringParamの値は" + StringParam);
		System.out.println("IntegerParamの値は" + IntegerParam);

		// JobExecutionContextを定義する
		ExecutionContext jobContext = contribution.getStepExecution()
				.getJobExecution()
				.getExecutionContext();
		// JobExecutionContextにTasklet1の値を格納する 格納した値はキーで管理する
		// 左がキー 右が値
		jobContext.put("tasklet1JobKey1" , "tasklet1JobValue1");

		return RepeatStatus.FINISHED;
	}
}
新しいTaskletを「Tasklet2」として準備し、編集します。
package com.batch.tasklet;

import org.springframework.batch.core.StepContribution;
import org.springframework.batch.core.configuration.annotation.StepScope;
import org.springframework.batch.core.scope.context.ChunkContext;
import org.springframework.batch.core.step.tasklet.Tasklet;
import org.springframework.batch.repeat.RepeatStatus;
import org.springframework.beans.factory.annotation.Value;
import org.springframework.stereotype.Component;

@Component("Tasklet2")
@StepScope
public class Tasklet2 implements Tasklet{

	// Tasklet1から受け取る値をキーで指定する
	@Value("#{JobExecutionContext['tasklet1JobKey1']}")
	private String tasklet1JobValue1;

	@Override
	public RepeatStatus execute(StepContribution contribution, ChunkContext chunkContext) throws Exception {

		System.out.println("Tasklet2の出力です");
		System.out.println("Tasklet1から受け取った値 : " + tasklet1JobValue1);

		return RepeatStatus.FINISHED;
	}

}
作成した「Tasklet2」を「SpringConfig .java」に定義します。
package com.batch.config;

import org.springframework.batch.core.Job;
import org.springframework.batch.core.JobParametersValidator;
import org.springframework.batch.core.Step;
import org.springframework.batch.core.job.builder.JobBuilder;
import org.springframework.batch.core.launch.JobLauncher;
import org.springframework.batch.core.launch.support.RunIdIncrementer;
import org.springframework.batch.core.repository.JobRepository;
import org.springframework.batch.core.step.builder.StepBuilder;
import org.springframework.batch.core.step.tasklet.Tasklet;
import org.springframework.beans.factory.annotation.Autowired;
import org.springframework.beans.factory.annotation.Qualifier;
import org.springframework.context.annotation.Bean;
import org.springframework.context.annotation.Configuration;
import org.springframework.transaction.PlatformTransactionManager;

import com.batch.validator.Tasklet1JobParametersValidator;

/**
 * 設定クラス
 * このクラスはアプリケーションの設定を管理します。
 */

@Configuration
public class SpringConfig {
	// ジョブの実行を管理する
	private final JobLauncher jobLauncher;
	// ジョブの実行結果や進行状況をデータベースへ記録する
	private final JobRepository  jobRepository;
	// トランザクションを開始し、コミットまたはロールバックする
	private final PlatformTransactionManager platformTransactionManager;

	@Autowired
	@Qualifier("Tasklet1")
	private Tasklet Tasklet1;

	@Autowired
	@Qualifier("Tasklet2")
	private Tasklet Tasklet2;


	public SpringConfig(JobLauncher jobLauncher, JobRepository jobRepository,
			PlatformTransactionManager platformTransactionManager) {
		this.jobLauncher = jobLauncher;
		this.jobRepository = jobRepository;
		this.platformTransactionManager = platformTransactionManager;
	}

	// 検証クラスの呼び出し
	@Bean
	public JobParametersValidator jobParametersValidator() {
		return new Tasklet1JobParametersValidator();
	}


	// Stepを定義する
	@Bean
	public Step tasklet1Step1() {
		// 第一引数はStep名を定義する
		return new StepBuilder("tasklet1Step1" , jobRepository)
				// Taskletを指定する
				.tasklet(Tasklet1 , platformTransactionManager)
				.build();
	}

	// Stepを定義する
		@Bean
		public Step tasklet1Step2() {
			// 第一引数はStep名を定義する
			return new StepBuilder("tasklet1Step2" , jobRepository)
					// Taskletを指定する
					.tasklet(Tasklet2 , platformTransactionManager)
					.build();
		}

	// Jobを定義する
	@Bean
	public Job tasklet1Job1() {
		// 第一引数はJob名を定義する
		return new JobBuilder("tasklet1Job1" , jobRepository)
				// ジョブを実行するたびに一意のIDを生成
				.incrementer(new RunIdIncrementer())
				// 実行するStepを指定する
				.start(tasklet1Step1())
				.next(tasklet1Step2())
				// 検証する
				.validator(jobParametersValidator())
				.build();
	}

}
それでは実行してみましょう!

「Tasklet1」から「Tasklet2」に値を受け取れているのが確認できると思います。
おわりに
SpringBatchで値の受渡しを行う際にコマンドライン引数を用いて基礎的な値の受渡しの確認を行い
JobParametersValidatorで値の検証方法とJobExecutionContextの使用方法など解説しました。
最後までお読みいただきありがとうございました。


コメント