はじめに
こちらの記事はSpringSecurityでDBの値を使用してログインが出来るように実装する手順を解説しています。
今回は、「UserDetailsService」「UserRepository」などを編集し、実際にDBの値を用いてログイン出来る所までがゴールとなります。
過去の記事が作成手順の流れとなりますので、お読みでない方は参照頂けると幸いです。
SpringSecurityでログイン機能の導入手順を解説しています
SpringSecurityでデフォルトのログインが出来る手順を解説しています
SpringSecurityのWebSecurityConfigの設定に関して解説しています
ログイン機能の実装
UserDetailsImpl.javaを作成する
それでは「security」パッケージを右クリックし「UserDetailsImpl.java」を作成しましょう。

下記のように、編集していきます。
package com.app.progTrack.security;

import java.util.Collection;

import org.springframework.security.core.GrantedAuthority;
import org.springframework.security.core.userdetails.UserDetails;

import com.app.progTrack.entity.User;

public class UserDetailsImpl implements UserDetails {

	private final User user;
	private final Collection<GrantedAuthority> authorities;

	public UserDetailsImpl (User user, Collection<GrantedAuthority> authorities) {
		this.user = user;
		this.authorities = authorities;
	}

	public User getUser() {
		return user;
	}

	@Override
	public String getPassword() {
		return user.getPassword();
	}

	@Override
	public String getUsername() {
		return user.getEmail();
	}

	// ユーザーが有効であればtrueを返す
	@Override
	public boolean isEnabled() {
		return user.getEnabled();
	}

	// ユーザーの権限を返す
	@Override
	public Collection<? extends GrantedAuthority> getAuthorities() {
		return authorities;
	}

}- GrantedAuthority: ユーザーに付与される権限を表す
- UserDetails: SpringSecurityがユーザー情報を管理するインターフェース
- User: ユーザー情報を持つエンティティ
このクラスは、これから編集するクラスである「UserDetailsService.java」から送られてきた情報が入るクラスだと思ってもらえるとよいです。
UserRepositoryを編集する
既存のインターフェースである「U
UserRepositoryserRepository.java」を編集します。以下のように編集しましょう。
package com.app.progTrack.repository;

import org.springframework.data.jpa.repository.JpaRepository;

import com.app.progTrack.entity.User;

public interface UserRepository extends JpaRepository<User, Integer>{

	// ログイン時のパスワード取得用
	public User findByEmail(String email);
}
UserDetailsService.javaを作成する
それでは、「UserDetailsService.java」を作成していきましょう!

下記のように編集していきます。
以下のコードの流れは以下です。
- ユーザーの「email」を取得し、「User型のuser」へ格納
- 「文字列型 UserRoleName」に「1」の権限を取得しその権限名を取得した情報を代入する
- 「ArrayList型でauthorities」という権限管理用オブジェクトを作成する。
- 「SpringSecurity」の認可処理に使用される実装クラスを作成し、先ほどの権限名を格納する「new SimpleGrantedAuthority(userRoleName)」
- 「ArrayList型で用意したauthorities」に追加(add)する これにより権限名を用意する事が出来た
- 「UserDetailsImpl」に「user, authorities」を返す。
package com.app.progTrack.security;

import java.util.ArrayList;
import java.util.Collection;

import org.springframework.security.core.GrantedAuthority;
import org.springframework.security.core.authority.SimpleGrantedAuthority;
import org.springframework.security.core.userdetails.UserDetails;
import org.springframework.security.core.userdetails.UserDetailsService;
import org.springframework.security.core.userdetails.UsernameNotFoundException;
import org.springframework.stereotype.Service;

import com.app.progTrack.entity.User;
import com.app.progTrack.repository.UserRepository;

@Service
public class UserDetailsServiceImpl implements UserDetailsService{
	private final UserRepository userRepository;

	public UserDetailsServiceImpl (UserRepository userRepository) {
		this.userRepository = userRepository;
	}

	public UserDetails loadUserByUsername(String eamil) throws UsernameNotFoundException {

		try {

			User user = userRepository.findByEmail(eamil);
			String userRoleName = user.getRole().getRoleName();
			Collection<GrantedAuthority> authorities = new ArrayList<>();
			authorities.add(new SimpleGrantedAuthority(userRoleName));
			return new UserDetailsImpl(user, authorities);

		} catch (Exception e) {

			throw new UsernameNotFoundException("ユーザーが見つかりませんでした");
		}
	}
}
1.ユーザーの「email」を取得し、「User型のuser」へ格納
User user = userRepository.findByEmail(eamil);2.「文字列型 UserRoleName」に「1」の権限を取得しその権限名を取得した情報を代入する
String userRoleName = user.getRole().getRoleName();3.「ArrayList型でauthorities」という権限管理用オブジェクトを作成する。
Collection<GrantedAuthority> authorities = new ArrayList<>();4.「SpringSecurity」の認可処理に使用される実装クラスを作成し、先ほどの権限名を格納する「new SimpleGrantedAuthority(userRoleName)」
5.「ArrayList型で用意したauthorities」に追加(add)する これにより権限名を用意する事が出来た
authorities.add(new SimpleGrantedAuthority(userRoleName));6.「UserDetailsImpl」に「user, authorities」を返す。
return new UserDetailsImpl(user, authorities);ブラウザで確認
それでは、ブラウザで確認してみましょう!
テストデータに関して注意点です。
「user_id」がキー値となります。今保存されているDBでusersテーブル「user_id」がいくつかを確認いただき、study_timesテーブルにある「user_id」を同じ数値にして頂けると、問題なく動くと思います。またログイン時に使用するパスワードに関しては必ず *1「password」と入力してください。
*1 パスワードはハッシュ化した値をDBに挿入しているため
以下のような形でデータを作成いただければと思います。

ですので踏まえますと、上記のデータの場合のログイン情報は以下となります。
- メールアドレス:a@sample.jp
- パスワード:password
※下記画像は古い画像なので入力されている文字列は違いますが、気になさらないでください。

ログインボタンを押すと

ログイン出来ましたね!それではログアウトボタンを押してみましょう!

ログアウトとエラーの場合の表示
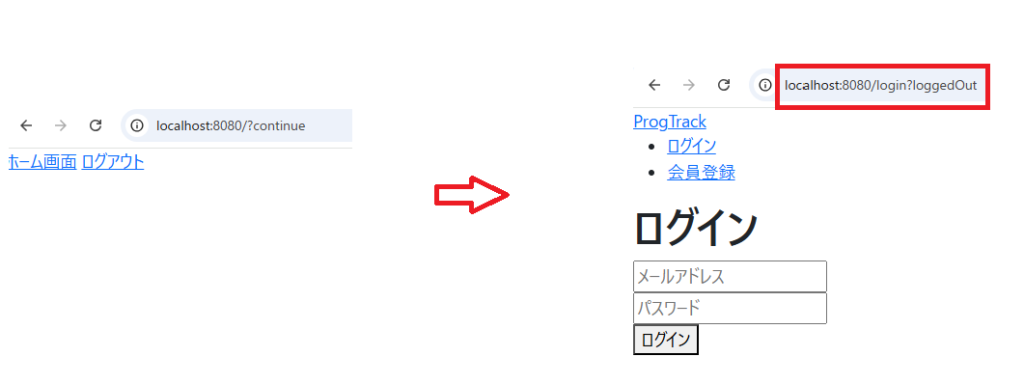
ではアプリケーションを立ち上げたまま、以下の挙動を確認してURLを見てみましょう!
- 何も入力しないで、そのままログインボタンを押す

errorというURLに飛んでますね?
- ログアウトした後のURLを確認してみる

loggedOutというURLに飛んでますね?
こういったURLの遷移先を決めていたのが前章で作成した「WebSecurityConfig.java」だったんだ!と分かって頂けると理解が早いかなと思います。それぞれ27行目と32行目で定義してますね。
package com.app.progTrack.security;

import org.springframework.context.annotation.Bean;
import org.springframework.context.annotation.Configuration;
import org.springframework.security.config.annotation.method.configuration.EnableMethodSecurity;
import org.springframework.security.config.annotation.web.builders.HttpSecurity;
import org.springframework.security.config.annotation.web.configuration.EnableWebSecurity;
import org.springframework.security.crypto.bcrypt.BCryptPasswordEncoder;
import org.springframework.security.crypto.password.PasswordEncoder;
import org.springframework.security.web.SecurityFilterChain;

@Configuration
@EnableWebSecurity
@EnableMethodSecurity
public class WebSecurityConfig {
	@Bean
	public SecurityFilterChain securityFilterChain(HttpSecurity http) throws Exception {

		http.authorizeHttpRequests((requests) -> requests
			.requestMatchers("/css/**").permitAll()
			.anyRequest().authenticated()
		)

		.formLogin((form) -> form.loginPage("/login")
			.loginProcessingUrl("/login")
			.defaultSuccessUrl("/?loggedIn")
			.failureUrl("/login?error")
			.permitAll()
		)

		.logout((logout) -> logout
			.logoutSuccessUrl("/login?loggedOut")
			.permitAll()
		);

		return http.build();
	}

	@Bean
	public PasswordEncoder passwordEncoder() {
		return new BCryptPasswordEncoder();
	}
}
このように、遷移先によってURLが変わって表示される事は理解できたと思います。この仕組みを利用して、「A」のURLなら「AAA」を表示するという分岐のような処理がthymeleafで可能なので、実装していきます。
login.htmlを編集する
それでは「login.html」を編集していきましょう。今回の編集をする事で、入力フォームのエラーページでメッセージを表示させたり、ログアウトしたページでメッセージを表示させることが出来るようになります。
27~29行目と31~33行目にコードを追加しましょう。
<!DOCTYPE html>
<html>
<head>
	<meta charset="UTF-8">
	<title>ログイン画面</title>
	<!-- Bootstrap -->
	<link href="https://cdn.jsdelivr.net/npm/bootstrap@5.3.0/dist/css/bootstrap.min.css" rel="stylesheet" integrity="sha384-9ndCyUaIbzAi2FUVXJi0CjmCapSmO7SnpJef0486qhLnuZ2cdeRhO02iuK6FUUVM" crossorigin="anonymous">

</head>
<body>
	<header>
		<nav>
			<a th:href="@{/}">ProgTrack</a>
			<ul>
				<li>
					<a th:href="@{/login}">ログイン</a>
				</li>
				<li>
					<a th:href="@{/signup}">会員登録</a>
				</li>
			</ul>
		</nav>
	</header>
	<main>
		<h1>ログイン</h1>

		<div th:if="${param.loggedOut}">
			ログアウトしました
		</div>

		<div th:if="${param.error}">
			メールアドレス、パスワードが正しく入力されていません
		</div>

		<form th:action="@{/login}" method="post">

			<div>
				<input type="text" name="username" autocomplete="email" placeholder="メールアドレス" autoffocus>
			</div>
			<div>
				<input type="password" name="password" autocomplete="new-password" placeholder="パスワード">
			</div>
			<div>
				<button type="submit">ログイン</button>
			</div>

		</form>
	</main>


	<!-- Bootstrap -->
    <script src="https://cdn.jsdelivr.net/npm/bootstrap@5.3.0/dist/js/bootstrap.bundle.min.js" integrity="sha384-geWF76RCwLtnZ8qwWowPQNguL3RmwHVBC9FhGdlKrxdiJJigb/j/68SIy3Te4Bkz" crossorigin="anonymous"></script>
</body>
</html>
それでは、ブラウザで確認してみましょう!


ログインとログアウトした時のページ遷移を編集する
WebSecurityConfig.javaの編集
「WebSecurityConfig.java」を21行目と27行目を下記のように編集してください。
- 新しく「/」へ遷移できるように全てのユーザーに権限を与えます
- ログイン後のページ遷移を「/studytime」へ遷移するように指定します。
package com.app.progTrack.security;

import org.springframework.context.annotation.Bean;
import org.springframework.context.annotation.Configuration;
import org.springframework.security.config.annotation.method.configuration.EnableMethodSecurity;
import org.springframework.security.config.annotation.web.builders.HttpSecurity;
import org.springframework.security.config.annotation.web.configuration.EnableWebSecurity;
import org.springframework.security.crypto.bcrypt.BCryptPasswordEncoder;
import org.springframework.security.crypto.password.PasswordEncoder;
import org.springframework.security.web.SecurityFilterChain;

@Configuration
@EnableWebSecurity
@EnableMethodSecurity
public class WebSecurityConfig {
	@Bean
	public SecurityFilterChain securityFilterChain(HttpSecurity http) throws Exception {

		http.authorizeHttpRequests((requests) -> requests
			// 全てのユーザーにアクセスを許可するURLを設定できる
			.requestMatchers("/css/**", "/").permitAll()
			.anyRequest().authenticated()
		)

		.formLogin((form) -> form.loginPage("/login")
			.loginProcessingUrl("/login")
			.defaultSuccessUrl("/studytime")
			.failureUrl("/login?error")
			.permitAll()
		)

		.logout((logout) -> logout
			.logoutSuccessUrl("/login?loggedOut")
			.permitAll()
		);

		return http.build();
	}

	@Bean
	public PasswordEncoder passwordEncoder() {
		return new BCryptPasswordEncoder();
	}
}
home.htmlを編集する
このコードは、これからまだまだ改良しますが、一旦下記に編集ください。
<!DOCTYPE html>
<html xmlns:th="http://www.thymeleaf.org">
<head>
	<meta charset="UTF-8">
	<title>ホーム画面</title>
	<!-- Bootstrap -->
    <link href="https://cdn.jsdelivr.net/npm/bootstrap@5.3.0/dist/css/bootstrap.min.css" rel="stylesheet" integrity="sha384-9ndCyUaIbzAi2FUVXJi0CjmCapSmO7SnpJef0486qhLnuZ2cdeRhO02iuK6FUUVM" crossorigin="anonymous">
</head>
<body>
	<nav>
		<a th:href="@{/}">ProgTrack</a>

	</nav>

	<h2>勉強を習慣にしていこう!</h2>
	<h3>自分の勉強した時間を記録していこう!</h3>

	<a th:href="@{/login}" onclick="event.preventDefault(); document.getElementById('login-form').submit();">すでにアカウントをお持ちの方</a>
	<form id="login-form" th:action="@{/login}" method="get"></form>

	<!-- Bootstrap -->
    <script src="https://cdn.jsdelivr.net/npm/bootstrap@5.3.0/dist/js/bootstrap.bundle.min.js" integrity="sha384-geWF76RCwLtnZ8qwWowPQNguL3RmwHVBC9FhGdlKrxdiJJigb/j/68SIy3Te4Bkz" crossorigin="anonymous"></script>
</body>
</html>
studyTimeList.htmlを編集
ホーム画面用のURLとログアウトを用意するため、10~16行目にリンクを追加します。
<!DOCTYPE html>
<html xmlns:th="http://www.thymeleaf.org">
<head>
	<meta charset="UTF-8">
	<title>学習時間一覧</title>
	<!-- Bootstrap -->
    <link href="https://cdn.jsdelivr.net/npm/bootstrap@5.3.0/dist/css/bootstrap.min.css" rel="stylesheet" integrity="sha384-9ndCyUaIbzAi2FUVXJi0CjmCapSmO7SnpJef0486qhLnuZ2cdeRhO02iuK6FUUVM" crossorigin="anonymous">
</head>
<body>
	<nav>
		<li><a th:href="@{/studytime}">ProgTrack</a></li>
		<li>
			<a th:href="@{/logout}" onclick="event.preventDefault(); document.getElementById('logout-form').submit();">ログアウト</a>
			<form id="logout-form" th:action="@{/logout}" method="post"></form>
		</li>
	</nav>
	<div class="container">
		<div class="row mb-3 mt-5">
			<div class="col-6"><h3 class="text-left">学習時間一覧</h3></div>
			<div class="col-6">
				<div class="text-left mb-3 border-bottom pb-2">表示年月選択</div>
				<div class="row mb-3">
				    <form action="/studytime" method="get" class="d-flex">
				        <div class="col-3 me-3">
				            <select name="year" class="form-select">
				                <th:block th:each="year : ${years}">
				                    <option th:value="${year}" th:text="${year}" th:selected="${year == currentYear}"></option>
				                </th:block>
				            </select>
				        </div>
				        <div class="col-3 me-3">
				            <select name="month" class="form-select">
				                <th:block th:each="month : ${months}">
				                    <option th:value="${month}" th:text="${month}" th:selected="${month == currentMonth}"></option>
				                </th:block>
				            </select>
				        </div>
				        <div class="col-3 ml-3">
				            <button type="submit" class="btn btn-primary">表示</button>
				        </div>
				    </form>
				</div>
			</div>
		</div>
		<div class="row">
			<div class="col-6">
				<a th:href="@{/studytime/new}">学習時間を管理</a>
			</div>
			<div class="col-6">
				<div class="row">
					<div class="col-6"><p>当月: <sapn th:text="${currentMonthTotal}"></sapn>時間</p></div>
					<div class="col-6"><p>前月: <sapn th:text="${lastMonthTotal}"></sapn>時間</p></div>
				</div>
			</div>
		</div>
		<div class="row">
			<table class="table table-striped table-hover">
			    <thead class="table-primary">
			        <tr>
			            <th>日付</th>
			            <th>開始時間</th>
			            <th>終了時間</th>
			            <th>操作</th>
			        </tr>
			    </thead>
			    <tbody>
			        <tr th:each="studyTime : ${studyTimes}">
			            <td th:text="${studyTime.startTime.format(T(java.time.format.DateTimeFormatter).ofPattern('yyyy/MM/dd'))}"></td>
			            <td th:text="${studyTime.startTime.format(T(java.time.format.DateTimeFormatter).ofPattern('HH時mm分'))}"></td>
			            <td th:text="${studyTime.endTime != null ? studyTime.endTime.format(T(java.time.format.DateTimeFormatter).ofPattern('HH時mm分')): ''}"></td>
			            <td>
			                <a th:href="@{/studytime/{id}/edit(id=${studyTime.studyTimesId})}" class="btn btn-warning btn-sm me-3">編集</a>
			                <form th:action="@{/studytime/{id}/delete(id=${studyTime.studyTimesId})}" method="post" style="display: inline;">
			                    <button type="submit" class="btn btn-danger btn-sm">削除</button>
			                </form>
			            </td>
			        </tr>
			    </tbody>
			</table>
		</div>
	</div>
	<!-- Bootstrap -->
    <script src="https://cdn.jsdelivr.net/npm/bootstrap@5.3.0/dist/js/bootstrap.bundle.min.js" integrity="sha384-geWF76RCwLtnZ8qwWowPQNguL3RmwHVBC9FhGdlKrxdiJJigb/j/68SIy3Te4Bkz" crossorigin="anonymous"></script>
</body>
</html>
画面遷移の流れ
- ホーム画面からログインページへ遷移出来る
- ログインページからホーム画面に遷移できる、ログインする事が出来る
- ログインした時の遷移先は学習時間一覧画面へ遷移する ログアウトするとログインページに遷移する
「ホーム画面」

「ログインページ」

「学習時間一覧画面」

「ログインページ」

おわりに
アプリケーションとして形になってきました。ここまで来ると結構やりがいがありますね!次回でログイン機能に関しての記事は終わりにする予定です。ですので、次回実装は以下です。
- ログインした状態で「/」を入力すると遷移出来てしまうのを制限する
- レイアウトを調整する
それでは、また次回!お読みいただきありがとうございました。


コメント